Python CookBook
python2转Python3修改内容
struct.pack
struct.pack('!f', float_data).encode('hex')
改为
struct.pack('!f', float_data).hex()
struct.unpack
struct.unpack('!f', hex_data_str.decode('hex'))
改为
struct.unpack('!f', bytes.fromhex(hex_data_str))
str转bytes
字符串指针作为动态库函数的参数需要转换为bytes类型
bytes(sn, 'ascii')
bytes转字符串,str_output为b'abcdef'
str_output.decode('utf-8')

python3有两种表示字符序列的类型:bytes和str。前者的实例包含原始的8位值;后者的实例包含Unicode字符。
python2中也有两种表示字符序列的类型, 分别叫做str和unicode。与python3不同的是, str的实例包含原始的8位值, 而unicode的实例, 则包含Unicode字符。
文件打开
打开文件不支持file(firmwareName)函数, 需要改成open
open(firmwareName)
除法运算
在Python2中,除法的取值结果取整数
在Python3中,除法/的结果包含小数,如果只想取整数需要使用//
Python CRC计算
CRC-16/IBM x16 + x15 + x2 + 1
def crc_check(data):
    crc_temp = 0x0000
    for data_item in data:
        crc_temp ^= data_item
        for j in range(8):
            if crc_temp & 0x01:
                crc_temp = (crc_temp >> 1) ^ 0xA001
            else:
                crc_temp = crc_temp >> 1
    return crc_temp
参考:http://www.ip33.com/crc.html
Python向Excel中插入文件
安装pywin32
pip install pywin32
执行如下脚本
import os
import win32com.client as win32

xl = win32.gencache.EnsureDispatch('Excel.Application')
xl.Visible = 1
wb = xl.Workbooks.Open(os.path.join(os.getcwd(), 'TRT测试报告.xlsx'))
xl.DisplayAlerts = False
ws = wb.Worksheets('测试用例')
dest_cell = ws.Range('A110')
obj = ws.OLEObjects()
obj.Add(ClassType=None,Filename=os.path.join(os.getcwd(),'log.html'),Link=False,DisplayAsIcon=True,IconIndex=0,IconLabel='log.html',Left=dest_cell.Left,Top=dest_cell.Top)
ws.SaveAs(os.path.join(os.getcwd(), 'TRT测试报告.xlsx'))
xl.Workbooks.Close()
Python十六进制和十进制浮点数转换
python 2.7.15版本
import struct

def float_to_hex(float_data):
    result = []
    hex_data = struct.pack('!f', float_data).encode('hex')
    print str(float_data), hex_data
    for i in range(0, len(hex_data), 2):
        result.append(int(hex_data[i:i+2],16))
    return result

def hex_to_float(hex_data):
    '''
    hex_data: [0x3F,0xA0,0x00,0x00]
    '''
    hex_data_str = ''.join(['%02x'%data for data in hex_data])
    float_data = struct.unpack('!f', hex_data_str.decode('hex'))[0]
    print hex_data_str, str(float_data)
    return float_data
Python 3.6.8版本
def float_to_hex(float_data):
    result = []
    hex_data = struct.pack('!f', float_data).hex()
    logger.info('float:{},hex list:{}'.format(str(float_data), hex_data))
    for i in range(0, len(hex_data), 2):
        result.append(int(hex_data[i:i+2],16))
    return result

def hex_to_float(hex_data):
    '''
    hex_data: [0x3F,0xA0,0x00,0x00]
    '''
    hex_data_str = ''.join(['%02x'%data for data in hex_data])
    float_data = struct.unpack('!f', bytes.fromhex(hex_data_str))[0]
    logger.info('hex string:{},float:{}'.format(hex_data_str, str(float_data)))
    return float_data
调用举例
float_to_hex(3.78)
3.78 4071eb85
[64, 113, 235, 133]

hex_to_float([64, 113, 235, 133])
4071eb85 3.77999997139
3.7799999713897705
python 各进制转换
10进制转为2进制
bin(10) # 0b1010
2进制转为10进制
int('1001',2)  # 9
int('0b1101', 2) # 13
10进制转为16进制
hex(10) # 0xa
16进制到10进制
int('ff', 16)  # 255
int('0xab', 16)   # 171
10进制转为8进制
print("%o" % 10)  # 12
oct(8)  # 10
16进制到2进制
bin(0xa) # 0b1010
2进制到16进制
hex(0b1001) # 0x9
python 捕获键盘和鼠标输入
https://github.com/ethanhs/pyhooked/blob/master/pyhooked/init.py
"""
This file is part of pyhooked, an LGPL licensed pure Python hotkey module for Windows
Copyright (C) 2016 Ethan Smith
"""
import ctypes
from ctypes import wintypes
from ctypes import CFUNCTYPE, POINTER, c_int, c_uint, c_void_p, windll
from ctypes import byref
from warnings import warn
from traceback import format_exc
import atexit

__version__ = '0.8.1'

cmp_func = CFUNCTYPE(c_int, c_int, wintypes.HINSTANCE, POINTER(c_void_p))

# redefine names to avoid needless clutter
GetModuleHandleA = ctypes.windll.kernel32.GetModuleHandleA
SetWindowsHookExA = ctypes.windll.user32.SetWindowsHookExA
GetMessageW = ctypes.windll.user32.GetMessageW
DispatchMessageW = ctypes.windll.user32.DispatchMessageW
TranslateMessage = ctypes.windll.user32.TranslateMessage
CallNextHookEx = ctypes.windll.user32.CallNextHookEx
UnhookWindowsHookEx = ctypes.windll.user32.UnhookWindowsHookEx

# specify the argument and return types of functions
GetModuleHandleA.restype = wintypes.HMODULE
GetModuleHandleA.argtypes = [wintypes.LPCWSTR]
SetWindowsHookExA.restype = c_int
SetWindowsHookExA.argtypes = [c_int, cmp_func, wintypes.HINSTANCE, wintypes.DWORD]
GetMessageW.argtypes = [POINTER(wintypes.MSG), wintypes.HWND, c_uint, c_uint]
TranslateMessage.argtypes = [POINTER(wintypes.MSG)]
DispatchMessageW.argtypes = [POINTER(wintypes.MSG)]


def _callback_pointer(handler):
    """Create and return C-pointer"""
    return cmp_func(handler)


class BaseEvent(object):
    """A keyboard or mouse event."""
    pass

class KeyboardEvent(BaseEvent):
    """Class to describe an event triggered by the keyboard"""

    def __init__(self, current_key=None, event_type=None, pressed_key=None, key_code=None):
        self.current_key = current_key
        self.event_type = event_type
        self.pressed_key = pressed_key
        self.key_code = key_code


class MouseEvent(BaseEvent):
    """Class to describe an event triggered by the mouse"""

    def __init__(self, current_key=None, event_type=None, mouse_x=None, mouse_y=None):
        self.current_key = current_key
        self.event_type = event_type
        self.mouse_x = mouse_x
        self.mouse_y = mouse_y


# The following section contains dictionaries that map key codes and other event codes to the event type (e.g. key up)
# and the key or button doing the action (e.g. Tab)
MOUSE_ID_TO_KEY = {512: 'Move',
                   513: 'LButton',
                   514: 'LButton',
                   516: 'RButton',
                   517: 'RButton',
                   519: 'WheelButton',
                   520: 'WheelButton',
                   522: 'Wheel'}

MOUSE_ID_TO_EVENT_TYPE = {512: None,
                          513: 'key down',
                          514: 'key up',
                          516: 'key down',
                          517: 'key up',
                          519: 'key down',
                          520: 'key up',
                          522: None}

# stores the relation between keyboard event codes and the key pressed. Reference:
# https://msdn.microsoft.com/en-us/library/windows/desktop/dd375731(v=vs.85).aspx
# seems to only work on 32 bits
ID_TO_KEY = {8: 'Back',
             9: 'Tab',
             13: 'Return',
             20: 'Capital',
             27: 'Escape',
             32: 'Space',
             33: 'Prior',
             34: 'Next',
             35: 'End',
             36: 'Home',
             37: 'Left',
             38: 'Up',
             39: 'Right',
             40: 'Down',
             44: 'PrtScr',
             46: 'Delete',
             48: '0',
             49: '1',
             50: '2',
             51: '3',
             52: '4',
             53: '5',
             54: '6',
             55: '7',
             56: '8',
             57: '9',
             65: 'A',
             66: 'B',
             67: 'C',
             68: 'D',
             69: 'E',
             70: 'F',
             71: 'G',
             72: 'H',
             73: 'I',
             74: 'J',
             75: 'K',
             76: 'L',
             77: 'M',
             78: 'N',
             79: 'O',
             80: 'P',
             81: 'Q',
             82: 'R',
             83: 'S',
             84: 'T',
             85: 'U',
             86: 'V',
             87: 'W',
             88: 'X',
             89: 'Y',
             90: 'Z',
             91: 'Lwin',
             92: 'Rwin',
             93: 'App',
             95: 'Sleep',
             96: 'Numpad0',
             97: 'Numpad1',
             98: 'Numpad2',
             99: 'Numpad3',
             100: 'Numpad4',
             101: 'Numpad5',
             102: 'Numpad6',
             103: 'Numpad7',
             104: 'Numpad8',
             105: 'Numpad9',
             106: 'Multiply',
             107: 'Add',
             109: 'Subtract',
             110: 'Decimal',
             111: 'Divide',
             112: 'F1',
             113: 'F2',
             114: 'F3',
             115: 'F4',
             116: 'F5',
             117: 'F6',
             118: 'F7',
             119: 'F8',
             120: 'F9',
             121: 'F10',
             122: 'F11',
             123: 'F12',
             144: 'Numlock',
             160: 'Lshift',
             161: 'Rshift',
             162: 'Lcontrol',
             163: 'Rcontrol',
             164: 'Lmenu',
             165: 'Rmenu',
             186: 'Oem_1',
             187: 'Oem_Plus',
             188: 'Oem_Comma',
             189: 'Oem_Minus',
             190: 'Oem_Period',
             191: 'Oem_2',
             192: 'Oem_3',
             219: 'Oem_4',
             220: 'Oem_5',
             221: 'Oem_6',
             222: 'Oem_7',
             #223: 'OEM_8',
             1001: 'mouse left',  # mouse hotkeys
             1002: 'mouse right',
             1003: 'mouse middle',
             1000: 'mouse move',  # single event hotkeys
             1004: 'mouse wheel up',
             1005: 'mouse wheel down',
             1010: 'Ctrl',  # merged hotkeys
             1011: 'Alt',
             1012: 'Shift',
             1013: 'Win',
             }

event_types = {0x100: 'key down',  # WM_KeyDown for normal keys
               0x101: 'key up',  # WM_KeyUp for normal keys
               0x104: 'key down',  # WM_SYSKEYDOWN, used for Alt key.
               0x105: 'key up',  # WM_SYSKEYUP, used for Alt key.
               }
# these are used for specifying the hook type we want to make
WH_KEYBOARD_LL = 0x00D
WH_MOUSE_LL = 0x0E
# the Windows quit message, if the program quits while listening.
WM_QUIT = 0x0012


class Hook(object):
    """Main hotkey class used to and listen for hotkeys. Set an event handler to check what keys are pressed."""

    def __init__(self, warn_unrecognised = False):
        """Initializer of the Hook class, creates class attributes. If warn_unrecognised is True, warn when an unrecognised key is pressed."""
        self.warn_unrecognised = warn_unrecognised
        self.pressed_keys = []
        self.keyboard_id = None
        self.mouse_id = None
        self.mouse_is_hook = False
        self.keyboard_is_hook = True

    def handler(self, event):
        """Handle keyboard and mouse events."""
        raise NotImplementedError()

    def stop(self):
        """Stop this object from listening."""
        windll.user32.PostQuitMessage (0)

    def hook(self, keyboard=True, mouse=False):
        """Hook mouse and/or keyboard events"""
        self.mouse_is_hook = mouse
        self.keyboard_is_hook = keyboard

        # check that we are going to hook into at least one device
        if not self.mouse_is_hook and not self.keyboard_is_hook:
            raise Exception("You must hook into either the keyboard and/or mouse events")

        if self.keyboard_is_hook:
            def keyboard_low_level_handler(code, event_code, kb_data_ptr):
                """Used to catch keyboard events and deal with the event"""
                key_code = 0xFFFFFFFF & kb_data_ptr[0]  # key code
                current_key = ID_TO_KEY.get(key_code) # check the type of event (see ID_TO_KEY for a list)
                if current_key is None:
                    event = None # We can check this later.
                    if self.warn_unrecognised:
                        warn('Unrecognised key ID %d.' % key_code)
                else:
                    event_type = event_types[0xFFFFFFFF & event_code]

                    if event_type == 'key down':  # add key to those down to list
                        if current_key not in self.pressed_keys:
                            self.pressed_keys.append(current_key)

                    if event_type == 'key up':  # remove when no longer pressed
                        try:
                            self.pressed_keys.remove(current_key)
                        except ValueError:
                            pass # current_key is not in the list.

                    # wrap the keyboard information grabbed into a container class
                    event = KeyboardEvent(current_key, event_type, self.pressed_keys, key_code)

                # Call the event handler to deal with keys in the list
                try:
                    if event:
                        self.handler(event)
                except Exception as e:
                    warn('While handling {}, self.handler produced a traceback:\n{}'.format(event, format_exc()))
                finally:
                    # TODO: fix return here to use non-blocking call
                    return CallNextHookEx(self.keyboard_id, code, event_code, kb_data_ptr)

            keyboard_pointer = _callback_pointer(keyboard_low_level_handler)

            self.keyboard_id = SetWindowsHookExA(WH_KEYBOARD_LL, keyboard_pointer,
                                                 GetModuleHandleA(None),
                                                 0)

        if self.mouse_is_hook:
            def mouse_low_level_handler(code, event_code, kb_data_ptr):
                """Used to catch and deal with mouse events"""
                current_key = MOUSE_ID_TO_KEY.get(event_code)  # check the type of event (see MOUSE_ID_TO_KEY for a list)
                if current_key is None:
                    event = None # We can check this later.
                    if self.warn_unrecognised:
                        warn('Unrecognised mouse ID %d.' % event_code)
                else:
                    if current_key != 'Move':  # if we aren't moving, then we deal with a mouse click
                        event_type = MOUSE_ID_TO_EVENT_TYPE[event_code]
                        # the first two members of kb_data_ptr hold the mouse position, x and y
                        event = MouseEvent(current_key, event_type, kb_data_ptr[0], kb_data_ptr[1])

                try:
                    if event:
                        self.handler(event)
                except Exception as e:
                    warn('While handling {}, self.handler produced a traceback:\n{}'.format(event, format_exc()))
                finally:
                   # TODO: fix return here to use non-blocking call
                    return CallNextHookEx(self.mouse_id, code, event_code, kb_data_ptr)

            mouse_pointer = _callback_pointer(mouse_low_level_handler)
            self.mouse_id = SetWindowsHookExA(WH_MOUSE_LL, mouse_pointer,
                                              GetModuleHandleA(None), 0)

        atexit.register(UnhookWindowsHookEx, self.keyboard_id)
        atexit.register(UnhookWindowsHookEx, self.mouse_id)

        message = wintypes.MSG()
        while self.mouse_is_hook or self.keyboard_is_hook:
            msg = GetMessageW(byref(message), 0, 0, 0)
            if msg in [0, -1]:
                self.unhook_keyboard()
                self.unhook_mouse()
                break # Exit the loop.

            else:
                TranslateMessage(byref(message))
                DispatchMessageW(byref(message))

    def unhook_mouse(self):
        """Stop listening to the mouse"""
        if self.mouse_is_hook:
            self.mouse_is_hook = False
            UnhookWindowsHookEx(self.mouse_id)

    def unhook_keyboard(self):
        """Stop listening to the keyboard"""
        if self.keyboard_is_hook:
            self.keyboard_is_hook = False
            UnhookWindowsHookEx(self.keyboard_id)
Pyinstaller 将Python脚本打包成 exe
官方手册:
https://pyinstaller.readthedocs.io/en/v3.3.1/
安装
pip install PyInstaller
打包脚本
pyinstaller -F EEDModule.py
pyinstaller命令的参数介绍
+----------------------+----------------------------------------------------------------------------------------------------------------------------+
|    -h                |    显示帮助                                                                                                                |
+----------------------+----------------------------------------------------------------------------------------------------------------------------+
|    -v                |    显示版本号                                                                                                              |
+----------------------+----------------------------------------------------------------------------------------------------------------------------+
|    -p                |    指定额外的import路径, 类似于使用PYTHONPATH, 参见PYTHONPATH                                                              |
+----------------------+----------------------------------------------------------------------------------------------------------------------------+
|    -F, --onefile     |    生成结果是一个exe文件, 所有的第三方依赖、资源和代码均被打包进该exe内                                                    |
+----------------------+----------------------------------------------------------------------------------------------------------------------------+
|    -D, --onedir      |    生成结果是一个目录, 各种第三方依赖、资源和exe同时存储在该目录                                                           |
+----------------------+----------------------------------------------------------------------------------------------------------------------------+
|    --add-data        |    打包额外资源, 用法:pyinstaller main.py --add-data=src;dest。windows以;分割,linux以:分割                               |
+----------------------+----------------------------------------------------------------------------------------------------------------------------+
|    --add-binary      |    打包额外的代码, 用法:同--add-data。与--add-data不同的是,用binary添加的文件,pyi会分析它引用的文件并把它们一同添加进来 |
+----------------------+----------------------------------------------------------------------------------------------------------------------------+
|    --runtime-hook    |    指定用户--runtime-hook, 如果设置了此参数, 则--runtime-hook会在运行main.py之前被运行                                     |
+----------------------+----------------------------------------------------------------------------------------------------------------------------+
|    --runtime-tmpdir  |    指定运行时的临时目录, 默认使用系统临时目录                                                                              |
+----------------------+----------------------------------------------------------------------------------------------------------------------------+
|    --hidden-import   |    打包额外py库, pyi在分析过程中, 有些import没有正确分析出来, 运行时会报import error, 这时可以使用该参数                   |
+----------------------+----------------------------------------------------------------------------------------------------------------------------+
|    --clean           |    在本次编译开始时, 清空上一次编译生成的各种文件, 默认不清除                                                              |
+----------------------+----------------------------------------------------------------------------------------------------------------------------+
参考
https://blog.csdn.net/weixin_39000819/article/details/80942423 https://pyinstaller.readthedocs.io/en/v3.3.1/usage.html https://blog.csdn.net/bearstarx/article/details/81054134
python 根据某个或者某几个字段来排序列表, 字典, 以及自定义对象的排序
通过使用operator 模块的itemgetter 函数,可以非常容易的排序这样的数据结构
>>> rows = [{'fname': 'Brian', 'lname': 'Jones', 'uid': 1003},
...         {'fname': 'David', 'lname': 'Beazley', 'uid': 1002},
...         {'fname': 'John', 'lname': 'Cleese', 'uid': 1001},
...         {'fname': 'Big', 'lname': 'Jones', 'uid': 1004}]

>>> from operator import itemgetter

>>> rows_by_fname = sorted(rows, key=itemgetter('fname'))
>>> print(rows_by_fname)
[{'fname': 'Big', 'uid': 1004, 'lname': 'Jones'},
{'fname': 'Brian', 'uid': 1003, 'lname': 'Jones'},
{'fname': 'David', 'uid': 1002, 'lname': 'Beazley'},
{'fname': 'John', 'uid': 1001, 'lname': 'Cleese'}]

>>> rows_by_uid = sorted(rows, key=itemgetter('uid'))
>>> print(rows_by_uid)
[{'fname': 'John', 'uid': 1001, 'lname': 'Cleese'},
{'fname': 'David', 'uid': 1002, 'lname': 'Beazley'},
{'fname': 'Brian', 'uid': 1003, 'lname': 'Jones'},
{'fname': 'Big', 'uid': 1004, 'lname': 'Jones'}]

>>> rows_by_lfname = sorted(rows, key=itemgetter('lname','fname'))
>>> print(rows_by_lfname)
[{'fname': 'David', 'uid': 1002, 'lname': 'Beazley'},
{'fname': 'John', 'uid': 1001, 'lname': 'Cleese'},
{'fname': 'Big', 'uid': 1004, 'lname': 'Jones'},
{'fname': 'Brian', 'uid': 1003, 'lname': 'Jones'}]
也可以用lambda函数来实现同样的功能, 但是性能没有没有itemgetter()快
rows_by_fname = sorted(rows, key=lambda r: r['fname'])
rows_by_lfname = sorted(rows, key=lambda r: (r['lname'],r['fname']))
最后,不要忘了这节中展示的技术也同样适用于min() 和max() 等函数
>>> min(rows, key=itemgetter('uid'))
{'fname': 'John', 'lname': 'Cleese', 'uid': 1001}
>>> max(rows, key=itemgetter('uid'))
{'fname': 'Big', 'lname': 'Jones', 'uid': 1004}
下面是对元组不同项进行排序的例子
>>> from operator import itemgetter
>>> student_tuples = [
...     ('john', 'A', 15),
...     ('jane', 'B', 12),
...     ('dave', 'B', 10),
... ]
>>> sorted(student_tuples, key=itemgetter(0))
[('dave', 'B', 10), ('jane', 'B', 12), ('john', 'A', 15)]
>>> sorted(student_tuples, key=itemgetter(1))
[('john', 'A', 15), ('jane', 'B', 12), ('dave', 'B', 10)]
>>> sorted(student_tuples, key=itemgetter(2))
[('dave', 'B', 10), ('jane', 'B', 12), ('john', 'A', 15)]
>>> sorted(student_tuples, key=itemgetter(1,2))
[('john', 'A', 15), ('dave', 'B', 10), ('jane', 'B', 12)]
>>> sorted(student_tuples, key=itemgetter(1,0))
[('john', 'A', 15), ('dave', 'B', 10), ('jane', 'B', 12)]
也可以用lambda来替换itemgetter
>>> sorted(student_tuples, key=lambda r:(r[1],r[0]))
[('john', 'A', 15), ('dave', 'B', 10), ('jane', 'B', 12)]
下面是对自定义对象的不同属性进行排序的例子
# -*- coding: utf-8 -*-
# 在排序时, 可以用lambda表达式将对象map成keys
# 亦可以使用operator包中的attrgetter和itemgetter函数以提高效率
# 参考 http://wiki.python.org/moin/HowTo/Sorting

# 考虑 Student 对象
class Student:
    def __init__(self, name, grade, age):
            self.name = name
            self.grade = grade
            self.age = age
    def __repr__(self):
            return repr((self.name, self.grade, self.age))

# 建立一组Student对象
students = [
    Student('jane', 'B', 12),
    Student('john', 'A', 12),
    Student('dave', 'B', 10),
]

from operator import itemgetter, attrgetter

# 对students按照年龄排序
print sorted(students, key=attrgetter('age'))
# 其等价于
print sorted(students, key=lambda o: o.age)
# 输出: >>> [('dave', 'B', 10), ('jane', 'B', 12), ('john', 'A', 15)]

# 亦可以按多个key排序, 先按age再按grade排序
print sorted(students, key=attrgetter('age', 'grade'))
# 输出: >>> [('dave', 'B', 10), ('john', 'A', 12), ('jane', 'B', 12)]
在Windows下用Python加载和释放动态库
# 加载
dll = ctypes.cdll.LoadLibrary('F320.dll')

# 释放
win32api.FreeLibrary(dll._handle)
python sqlite3数据库操作
import sqlite3

conn = sqlite3.connect('atepipeline.db')
cursor = conn.cursor()
cursor.execute("create table BuildInfo (NUMBER integer PRIMARY KEY,GROUPNAME text,PROJECTNAME text,BRANCH text,COMMITID text,COMMITER text,BUILDDATE text,BUILDRESULT text);")
cursor.execute("create table CppCheckInfo (NUMBER integer,CODETYPE text,ERROR integer,WARNING integer,STYLE integer,PERFORMANCE integer,PORTABILITY integer);")
cursor.execute("create table ClocInfo (NUMBER integer,CODETYPE text,CODE integer,COMMENT integer,BLANK integer,FILE integer);")

cursor.execute('insert into BuildInfo values (3011,"new_project","xfp_10g_epon_olt","develop-eric-ss","6af54fac794ec6007220d08415893c2994ed1513","eric.yao@superxon.cn","2019-11-02 10:30:25","PASS");')
conn.commit()

cursor.execute('insert into CppCheckInfo values (3011,"software",0,0,0,0,0);')
conn.commit()

conn.close()
python打印纯文本图片
安装库pillow
执行如下脚本, 将输出重定向到一个文件, 然后用文本编辑器打开即可
from PIL import Image

char_arr = list("#$@B%8&WM#*oahkbdpqwmZO0QLCJUYXzcvunxrjft/\|()1{}[]?-_+~<>i!lI;:,\"^`'.")
# im = Image.open("StartTest.png")
im = Image.open("20150609005642.jpeg")
im = im.convert("RGBA")

txt = ""

def get_char(r, g, b, alpha):
    if alpha == 0:
        return " "
    gray = 0.2126 * r + 0.7152 * g + 0.0722 * b
    unit = (256.0 + 1) / len(char_arr)
    return char_arr[int(gray / unit)]

for i in range(im.height):
    for j in range(im.width):
        txt += get_char(*im.getpixel((j, i)))
    txt += "\n"
print(txt)
python打印字母的艺术纯文本图片
安装库art
pip install art
执行如下脚本
from art import *

myart = text2art('Start Test', font='block', chr_ignore=True)
print(myart) # 以下输出是修改过后的
'''
******************************************************************************************************************
*   _______   _________        __        _______      _________    _________   _________    _______   _________  *
*  /  ___  | |  _   _  |      /  \      |_   __ \    |  _   _  |  |  _   _  | |_   ___  |  /  ___  | |  _   _  | *
* |  (__ \_| |_/ | | \_|     / /\ \       | |__) |   |_/ | | \_|  |_/ | | \_|   | |_  \_| |  (__ \_| |_/ | | \_| *
*  '.___`-.      | |        / ____ \      |  __ /        | |          | |       |  _|  _   '.___`-.      | |     *
* |`\____) |    _| |_     _/ /    \ \_   _| |  \ \_     _| |_        _| |_     _| |___/ | |`\____) |    _| |_    *
* |_______.'   |_____|   |____|  |____| |____| |___|   |_____|      |_____|   |_________| |_______.'   |_____|   *
******************************************************************************************************************
'''

myart = text2art('Start Upgrade', font='block', chr_ignore=True)
print(myart) # 以下输出是修改过后的
'''
************************************************************************************************************************************************************
*  _______   _________        __        _______      _________   _____  _____   ______       ______     _______           __        ________     _________ *
* /  ___  | |  _   _  |      /  \      |_   __ \    |  _   _  | |_   _||_   _| |_   __ \   .' ___  |   |_   __ \         /  \      |_   ___ `.  |_   ___  |*
*|  (__ \_| |_/ | | \_|     / /\ \       | |__) |   |_/ | | \_|   | |    | |     | |__) | / .'   \_|     | |__) |       / /\ \       | |   `. \   | |_  \_|*
* '.___`-.      | |        / ____ \      |  __ /        | |       | |    | |     |  ___/  | |    ____    |  __ /       / ____ \      | |    | |   |  _|  _ *
*|`\____) |    _| |_     _/ /    \ \_   _| |  \ \_     _| |_      | `.__.' |    _| |_     \ `.___]  _|  _| |  \ \_   _/ /    \ \_   _| |___.' /  _| |___/ |*
*|_______.'   |_____|   |____|  |____| |____| |___|   |_____|      `.____.'    |_____|     `._____.'   |____| |___| |____|  |____| |________.'  |_________|*
************************************************************************************************************************************************************
'''
反射
什么是反射:
在做程序开发中,我们常常会遇到这样的需求:需要执行对象里的某个方法,或需要调用对象中的某个变量,但是由于种种原因我们无法确定这个方法或变量是否存在,这是我们需要用一个特殊的方法或机制要访问和操作这个未知的方法或变量,这中机制就称之为反射
反射是一个很重要的概念,它可以把字符串映射到实例的变量或者实例的方法然后可以去执行调用、修改等操作。它有四个重要的方法:
  - getattr 获取指定字符串名称的对象属性
  - setattr 为对象设置一个对象
  - hasattr 判断对象是否有对应的对象
  - delattr 删除指定的属性
attr是属性英文的前几个字母,属性指的是类中类变量、实例变量和方法。但是要注意不能是私有的,如果你的变量是以“_”开头,那将无法获取
反射常常用在动态加载模块的场景中
#!/usr/bin/env python
# -*- coding: utf-8 -*-
# Author: rex.cheny
# E-mail: rex.cheny@outlook.com

class TestObj(object):

    def __init__(self, name, age):
        self.name = name
        self.age = age

    def displayName(self):
        print("displayName方法执行,打印姓名:", self.name)


def AAA(self):
    print("I am AAA.")


def main():
    to = TestObj("Tom", 23)
    # 查看 to 实例里面是否有 name 这个属性
    if hasattr(to, "name"):
        print("实例 to 中有 name 属性。")
        print(getattr(to, "name"))
    else:
        print("实例 to 中没有 name 属性。")

    if hasattr(to, "displayName"):
        print("实例 to 中有 displayName 属性。")
        getattr(to, "displayName")()
    else:
        print("实例 to 中没有 displayName 属性。")

    if hasattr(to, "AAA"):
        print("实例 to 中有 AAA 属性。")
        getattr(to, "AAA")()
    else:
        print("实例 to 中没有 AAA 属性,将会设置。")
        setattr(to, "AAA", AAA)  # 参数:实例、方法名称、具体方法  相当于 to.AAA = AAA 第一个AAA是函数在实例中的名称, 第二个AAA是把哪个函数放进去,两者只是恰好这里名称一样

        # to.AAA(to)  # 这里一定要主动传递一个实例进去,因为它不会自动装配self
        getattr(to, "AAA")(to)


if __name__ == '__main__':
    main()
AAA是动态装载到实例里面去的
可能有些人还没明白反射,反射就是把字符串反射成内存对象,看下面的例子
#!/usr/bin/env python
# -*- coding: utf-8 -*-
# Author: rex.cheny
# E-mail: rex.cheny@outlook.com


class TestObj(object):
    def __init__(self, name):
        self.name = name


def displayname(self):
    print(self.name)


def main():
    to = TestObj(name="Tom")

    cmd = input("输入:")
    if hasattr(to, cmd):
        pass
    else:
        setattr(to, cmd, displayname)
        func = getattr(to, cmd)
        func(to)


if __name__ == '__main__':
    main()
根据用户输入来调用函数(这个函数肯定要提前的真实存在)。我这里无论我输入什么都可以执行上面的displayname方法。现在应该明白字符串映射到方法了吧。
反射使用
通过字符串导入模块
#!/usr/bin/env python
# -*- coding: utf-8 -*-
# Author: rex.cheny
# E-mail: rex.cheny@outlook.com

temp = "re"
model = __import__(temp)


def main():
    txt = "hj123uo"
    pattern = model.compile(r"[0-9]+")
    print(model.search(pattern, txt).group())


if __name__ == '__main__':
    main()
以字符串的形式使用模块的方法
#!/usr/bin/env python
# -*- coding: utf-8 -*-
# Author: rex.cheny
# E-mail: rex.cheny@outlook.com

temp = "re"  # 要引入的模块
func = "compile"  # 要使用的方法
model = __import__(temp)  # 导入模块
function = getattr(model, func)  # 找到模块中的属性


def main():
    txt = "hj123uo"
    pattern = function(r"[0-9]+")  # 这里执行funcation()就等于执行re.compile()函数
    print(model.search(pattern, txt).group())


if __name__ == '__main__':
    main()
反射到底有什么用:
上面使用re.compile()函数的整个过程看起来很麻烦,但是你要知道这就等于实现了动态加载和执行所需要的模块或方法而不需要全部写入到PY文件中,当然具体需要执行的方法你也要提前实现。典型的使用场景就是web的URL路由。目前所有的web框架的URL路由基本都是这个原理。 用户输入不同的URL如何加载不同的PY文件以及调用里面的方法呢?你想一想Django里面,它并不是这样的,它依然需要你设置URL以及该URL对应的PY文件,为什么?因为这样调试方便,当然你能力足够也可以给它改写成反射的机制。
以下是另一篇比较好的文章:
在做程序开发中,我们常常会遇到这样的需求:需要执行对象里的某个方法,或需要调用对象中的某个变量,但是由于种种原因我们无法确定这个方法或变量是否存在,这是我们需要用一个特殊的方法或机制要访问和操作这个未知的方法或变量,这种机制就称之为反射。接下记录下反射几个重要方法:
hasattr
判断对象中是否有这个方法或变量
class Person(object):
    def __init__(self,name):
        self.name = name
    def talk(self):
        print("%s正在交谈"%self.name)

p = Person("laowang")
print(hasattr(p,"talk"))    # True。因为存在talk方法
print(hasattr(p,"name"))    # True。因为存在name变量
print(hasattr(p,"abc"))     # False。因为不存在abc方法或变量
getattr
获取对象中的方法或变量的内存地址
class Person(object):
    def __init__(self,name):
        self.name = name
    def talk(self):
        print("%s正在交谈"%self.name)
p = Person("laowang")

n = getattr(p,"name")   # 获取name变量的内存地址
print(n)                # 此时打印的是:laowang

f = getattr(p,"talk")   # 获取talk方法的内存地址
f()                     # 调用talk方法

我们发现getattr有三个参数,那么第三个参数是做什么用的呢?
s = getattr(p,"abc","not find")
print(s)                # 打印结果:not find。因为abc在对象p中找不到,本应该报错,属性找不到,但因为修改了找不到就输出not find
setattr
为对象添加变量或方法
def abc(self):
    print("%s正在交谈"%self.name)

class Person(object):
    def __init__(self,name):
        self.name = name

p = Person("laowang")
setattr(p,"talk",abc)   # 将abc函数添加到对象中p中,并命名为talk
p.talk(p)               # 调用talk方法,因为这是额外添加的方法,需手动传入对象


setattr(p,"age",30)     # 添加一个变量age,复制为30
print(p.age)            # 打印结果:30
delattr
删除对象中的变量。注意:不能用于删除方法
class Person(object):
    def __init__(self,name):
        self.name = name
    def talk(self):
        print("%s正在交谈"%self.name)

p = Person("laowang")

delattr(p,"name")       # 删除name变量
print(p.name)           # 此时将报错
对编程语言比较熟悉的朋友,应该知道“反射”这个机制。Python作为一门动态语言,当然不会缺少这一重要功能。然而,在网络上却很少见到有详细或者深刻的剖析论文。下面结合一个web路由的实例来阐述python的反射机制的使用场景和核心本质。
一. 前言
def f1():
    print("f1是这个函数的名字!")

s = "f1"
print("%s是个字符串" % s)
在上面的代码中,我们必须区分两个概念,f1和”f1”。前者是函数f1的函数名,后者只是一个叫”f1“的字符串,两者是不同的事物。我们可以用f1()的方式调用函数f1,但我们不能用”f1”()的方式调用函数。说白了就是,不能通过字符串来调用名字看起来相同的函数!
二. Web实例
考虑有这么一个场景,根据用户输入的url的不同,调用不同的函数,实现不同的操作,也就是一个url路由器的功能,这在web框架里是核心部件之一。下面有一个精简版的示例:
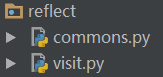
首先,有一个commons模块,它里面有几个函数,分别用于展示不同的页面,代码如下:
def login():
    print("这是一个登陆页面!")

def logout():
    print("这是一个退出页面!")

def home():
    print("这是网站主页面!")
其次,有一个visit模块,作为程序入口,接受用户输入,展示相应的页面,代码如下:(这段代码是比较初级的写法)
import commons

def run():
    inp = input("请输入您想访问页面的url:  ").strip()
    if inp == "login":
        commons.login()
    elif inp == "logout":
        commons.logout()
    elif inp == "home":
        commons.home()
    else:
        print("404")

if __name__ == '__main__':
    run()
我们运行visit.py,输入:home,页面结果如下:
请输入您想访问页面的url:  home
这是网站主页面!
这就实现了一个简单的WEB路由功能,根据不同的url,执行不同的函数,获得不同的页面。 然而,让我们考虑一个问题,如果commons模块里有成百上千个函数呢(这非常正常)?。难道你在visit模块里写上成百上千个elif?显然这是不可能的!那么怎么破?
三. 反射机制
仔细观察visit中的代码,我们会发现用户输入的url字符串和相应调用的函数名好像!如果能用这个字符串直接调用函数就好了!但是,前面我们已经说了字符串是不能用来调用函数的。为了解决这个问题,python为我们提供一个强大的内置函数:getattr!我们将前面的visit修改一下,代码如下:
import commons

def run():
    inp = input("请输入您想访问页面的url:  ").strip()
    func = getattr(commons,inp)
    func()

if __name__ == '__main__':
    run()
首先说明一下getattr函数的使用方法:它接收2个参数,前面的是一个对象或者模块,后面的是一个字符串,注意了!是个字符串!
例子中,用户输入储存在inp中,这个inp就是个字符串,getattr函数让程序去commons这个模块里,寻找一个叫inp的成员(是叫,不是等于),这个过程就相当于我们把一个字符串变成一个函数名的过程。然后,把获得的结果赋值给func这个变量,实际上func就指向了commons里的某个函数。最后通过调用func函数,实现对commons里函数的调用。这完全就是一个动态访问的过程,一切都不写死,全部根据用户输入来变化。
执行上面的代码,结果和最开始的是一样的。
这就是python的反射,它的核心本质其实就是利用字符串的形式去对象(模块)中操作(查找/获取/删除/添加)成员,一种基于字符串的事件驱动!
这段话,不一定准确,但大概就是这么个意思。
四. 进一步完善
上面的代码还有个小瑕疵,那就是如果用户输入一个非法的url,比如jpg,由于在commons里没有同名的函数,肯定会产生运行错误,具体如下:
请输入您想访问页面的url:  jpg
Traceback (most recent call last):
  File "F:/Python/pycharm/s13/reflect/visit.py", line 16, in <module>
    run()
  File "F:/Python/pycharm/s13/reflect/visit.py", line 11, in run
    func = getattr(commons,inp)
AttributeError: module 'commons' has no attribute 'jpg'
那怎么办呢?其实,python考虑的很全面了,它同样提供了一个叫hasattr的内置函数,用于判断commons中是否具有某个成员。我们将代码修改一下:
import commons

def run():
    inp = input("请输入您想访问页面的url:  ").strip()
    if hasattr(commons,inp):
        func = getattr(commons,inp)
        func()
    else:
        print("404")

if __name__ == '__main__':
    run()
通过hasattr的判断,可以防止非法输入错误,并将其统一定位到错误页面。
其实,研究过python内置函数的朋友,应该注意到还有delattr和setattr两个内置函数。从字面上已经很好理解他们的作用了。
python的四个重要内置函数:getattr、hasattr、delattr和setattr较为全面的实现了基于字符串的反射机制。他们都是对内存内的模块进行操作,并不会对源文件进行修改。
五. 动态导入模块
上面的例子是在某个特定的目录结构下才能正常实现的,也就是commons和visit模块在同一目录下,并且所有的页面处理函数都在commons模块内。如下图:
但在现实使用环境中,页面处理函数往往被分类放置在不同目录的不同模块中,也就是如下图:
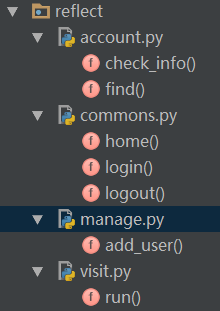
难道我们要在visit模块里写上一大堆的import 语句逐个导入account、manage、commons模块吗?要是有1000个这种模块呢? 刚才我们分析完了基于字符串的反射,实现了动态的函数调用功能,我们不禁会想那么能不能动态导入模块呢?这完全是可以的! python提供了一个特殊的方法:import(字符串参数)。通过它,我们就可以实现类似的反射功能。import()方法会根据参数,动态的导入同名的模块。 我们再修改一下上面的visit模块的代码
def run():
    inp = input("请输入您想访问页面的url:  ").strip()
    modules, func = inp.split("/")
    obj = __import__(modules)
    if hasattr(obj, func):
        func = getattr(obj, func)
        func()
    else:
        print("404")

if __name__ == '__main__':
    run()
运行一下:
请输入您想访问页面的url:  commons/home
这是网站主页面!

请输入您想访问页面的url:  account/find
这是一个查找功能页面!
我们来分析一下上面的代码:
首先,我们并没有定义任何一行import语句;
其次,用户的输入inp被要求为类似“commons/home”这种格式,其实也就是模拟web框架里的url地址,斜杠左边指向模块名,右边指向模块中的成员名。
然后,modules,func = inp.split(”/”)处理了用户输入,使我们获得的2个字符串,并分别保存在modules和func变量里。
接下来,最关键的是obj = import(modules)这一行,它让程序去导入了modules这个变量保存的字符串同名的模块,并将它赋值给obj变量。
最后的调用中,getattr去modules模块中调用func成员的含义和以前是一样的。
总结:通过__import__函数,我们实现了基于字符串的动态的模块导入。
同样的,这里也有个小瑕疵!
如果我们的目录结构是这样的:
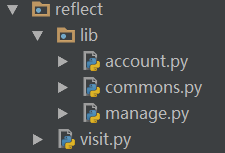
那么在visit的模块调用语句中,必须进行修改,我们想当然地会这么做:
def run():
    inp = input("请输入您想访问页面的url:  ").strip()
    modules, func = inp.split("/")
    obj = __import__("lib." + modules)      #注意字符串的拼接
    if hasattr(obj, func):
        func = getattr(obj, func)
        func()
    else:
        print("404")

if __name__ == '__main__':
    run()
改了这么一个地方:obj = import(”lib.” + modules),看起来似乎没什么问题,和import lib.commons的传统方法类似,但实际上运行的时候会有错误。
请输入您想访问页面的url:  commons/home
404

请输入您想访问页面的url:  account/find
404
为什么呢?因为对于lib.xxx.xxx.xxx这一类的模块导入路径,__import__默认只会导入最开头的圆点左边的目录,也就是“lib”。我们可以做个测试,在visit同级目录内新建一个文件,代码如下:
obj = __import__("lib.commons")
print(obj)
执行结果:
<module 'lib' (namespace)>
这个问题怎么解决呢?加上fromlist = True参数即可!
def run():
    inp = input("请输入您想访问页面的url:  ").strip()
    modules, func = inp.split("/")
    obj = __import__("lib." + modules, fromlist=True)  # 注意fromlist参数
    if hasattr(obj, func):
        func = getattr(obj, func)
        func()
    else:
        print("404")

if __name__ == '__main__':
    run()
至此,动态导入模块的问题基本都解决了,只剩下最后一个,那就是万一用户输入错误的模块名呢?比如用户输入了somemodules/find,由于实际上不存在somemodules这个模块,必然会报错!那有没有类似上面hasattr内置函数这么个功能呢?答案是没有!碰到这种,你只能通过异常处理来解决。
六. 最后的思考
可能有人会问python不是有两个内置函数exec和eval吗?他们同样能够执行字符串。比如:
exec("print('haha')")

结果:

haha
那么直接使用它们不行吗?非要那么费劲地使用getattr,__import__干嘛?
其实,在上面的例子中,围绕的核心主题是如何利用字符串驱动不同的事件,比如导入模块、调用函数等等,这些都是python的反射机制,是一种编程方法、设计模式的体现,凝聚了高内聚、松耦合的编程思想,不能简单的用执行字符串来代替。当然,exec和eval也有它的舞台,在web框架里也经常被使用。
Python用lxml模块解析XML编码问题
最近在用lxml模块解析一个XML文件的时候, XML文件中有中文的时候:
代码如下:
etree.parse(cloc_file)
会出现如下错误:
Traceback (most recent call last):
  File "gen_reports.py", line 481, in <module>
    SummaryHtml(build_list, db).build_html()
  File "gen_reports.py", line 309, in __init__
    self.cloc_result = ClocResult()
  File "gen_reports.py", line 134, in __init__
    self.analysis_result(os.path.join(report_root, 'Lint', 'software'))
  File "gen_reports.py", line 152, in analysis_result
    self.result[software_type] = self.__analysis_cloc(os.path.join(root, filename))
  File "gen_reports.py", line 138, in __analysis_cloc
    tree = etree.parse(cloc_file)
  File "src/lxml/etree.pyx", line 3426, in lxml.etree.parse
  File "src/lxml/parser.pxi", line 1840, in lxml.etree._parseDocument
  File "src/lxml/parser.pxi", line 1866, in lxml.etree._parseDocumentFromURL
  File "src/lxml/parser.pxi", line 1770, in lxml.etree._parseDocFromFile
  File "src/lxml/parser.pxi", line 1163, in lxml.etree._BaseParser._parseDocFromFile
  File "src/lxml/parser.pxi", line 601, in lxml.etree._ParserContext._handleParseResultDoc
  File "src/lxml/parser.pxi", line 711, in lxml.etree._handleParseResult
  File "src/lxml/parser.pxi", line 640, in lxml.etree._raiseParseError
  File "/var/lib/jenkins/userContent/platform/software_middleware/8/Lint/software/equipment/cloc.xml", line 13
lxml.etree.XMLSyntaxError: Input is not proper UTF-8, indicate encoding !
Bytes: 0xC6 0xC0 0xB9 0xC0, line 13, column 150
改成如下这种即可:
etree.parse(cloc_file, parser=etree.XMLParser(encoding="gb2312"))
Python threading 多线程返回值
```Python
import threading
import os
import sys

class TestThread(threading.Thread):
    def __init__(self, func, args=()):
        super(TestThread, self).__init__()
        self.func = func
        self.args = args

    def run(self):
        self.result = self.func(*self.args)

    def get_result(self):
        try:
            return self.result  # 如果子线程不使用join方法,此处可能会报没有self.result的错误
        except Exception:
            return None

def add(num):
    print(num)
    return num+1000


def task_run():
    try:
        p = []
        for i in range(5):
            p.append(TestThread(func=add, args=(i,)))
        for j in p:
            j.start()
        for j in p:
            j.join()
            res = j.get_result()
            print(res)
    except Exception as err:
        print(str(err))
```
Python 生成全排列数组
自己实现
import copy

def permutation(lst,k):
    result = []
    length = len(lst)
    tmp = [0]*k

    def next_num(a,ni=0):
        if ni == k:
            result.append(copy.copy(tmp))
            return
        for lj in a:
            tmp[ni] = lj
            b = a[:]
            b.pop(a.index(lj))
            next_num(b,ni+1)

    c = lst[:]
    next_num(c,0)

    return result


if __name__ == '__main__':
    lst = [1, 2, 3, 4]
    for i in permutation(lst, len(lst)):
        print(i)
使用itertools中的permutations函数
from itertools import permutations

s = [3, 2, 1, 4]
l = permutations(sorted(s))
for x in l:
    print(x)
Python2 写文件的时候有中文出现UnicodeEncodeError错误
错误信息
UnicodeEncodeError: 'ascii' codec can't encode characters in position 0-78: ordinal not in range(128)
本来以为数据读取错误,我特将fp.write改成print,结果数据全部读取并显示在命令控制台上了,证明代码是没有问题的, 仔细看了下异常信息,貌似是因为编码问题:Unicode编码与ASCII编码的不兼容,其实这个Python脚本文件是由utf-8编码的, 同时SQlite3数据库存取的也是UTF-8格式,Python默认环境编码通过下面的方法可以获取
可以通过如下方法解决
import sys
reload(sys)
sys.setdefaultencoding('utf-8')
如果缺少reload(sys)一句则会出现以下错误
Traceback (most recent call last):
File "<stdin>", line 1, in <module>
AttributeError: 'module' object has no attribute 'setdefaultencoding'
pyenv实现多个Python版本
系统 Centos 7
安装依赖包:
yum -y install gcc gcc-c++ make git patch openssl-devel zlib-devel readline-devel sqlite-devel bzip2-devel bzip2-libs ncurses-devel tk-devel gdbm-devel db4-devel libpcap-devel xz-devel
ubuntu
sudo apt-get install make build-essential libssl-dev zlib1g-dev
sudo apt-get install libbz2-dev libreadline-dev libsqlite3-dev wget curl
sudo apt-get install llvm libncurses5-dev libncursesw5-dev
下载pyenv
git clone https://github.com/pyenv/pyenv.git ~/.pyenv
配置
将如下语句加入到~/.bashrc中
export PYENV_ROOT="$HOME/.pyenv"
export PATH="$PYENV_ROOT/bin:$PATH"

eval "$(pyenv init --path)"
使配置生效
source .bashrc- 安装某个Python版本
首先我们可以查看一下有哪些版本的python 可以安装
pyenv install --list
安装
pyenv install 3.6.9常用命令
pyenv version            # 查看当前系统使用的python版本
pyenv versions           # 查看当前系统拥有的python版本
pyenv install 3.6.9      # 安装3.6.9,可使用-v参数查看详细输出
pyenv uninstall 3.6.9    # 卸载
pyenv local 3.6.9        # local仅对当前目录及子目录生效,告诉当前目录使用版本3.6.9,
pyenv global             # 告诉全局环境使用某个版本,为了不破坏系统环境,不建议使用global设置全局版本
pyenv rehash             # 重建环境变量,每当你增删 Python 版本或带有可执行文件的包(如 pip)以后,都应该执行一次本命令
配置pip国内源
新建文件 ~/.pip/pip.conf
并在文件中配置如下内容
[root@localhost ate]# cat ~/.pip/pip.conf
[global]
index-url = http://mirrors.aliyun.com/pypi/simple/
[install]
trusted-host = mirrors.aliyun.com
也可以使用其他国内源
阿里云 http://mirrors.aliyun.com/pypi/simple/
中国科技大学 https://pypi.mirrors.ustc.edu.cn/simple/
豆瓣(douban) https://pypi.douban.com/simple/
清华大学 https://pypi.tuna.tsinghua.edu.cn/simple/
中国科学技术大学 http://pypi.mirrors.ustc.edu.cn/simple/
也可以使用绝对路径执行pip命令安装第三方库
/root/.pyenv/versions/3.8.9/bin/python3.8 -m pip install paramiko
使用国内源安装Python版本
pyenv下载Python包的时候, 由于服务器在国外, 下载速度很慢, 可以使用国内源, 将Python包下载到~/.pyenv/cache/目录下, 然后再执行pyenv install命令安装
$ v=3.8.5; curl -L https://npm.taobao.org/mirrors/python/$v/Python-$v.tar.xz -o ~/.pyenv/cache/Python-$v.tar.xz; pyenv install $v
我们也可以创建一个方法, 放到~/.bashrc 文件中, 以后方便直接使用
function pyinstall() {
    v=$1
    echo '准备安装 Python' $v
    curl -L https://npm.taobao.org/mirrors/python/$v/Python-$v.tar.xz -o ~/.pyenv/cache/Python-$v.tar.xz
    pyenv install $v
}
$ pyinstall 3.8.0对于不能访问外网的服务器, 也可以在办公电脑上到https://npm.taobao.org/mirrors/python里找到对应的版本, 下载.tar.xz后缀的文件,
比如https://npm.taobao.org/mirrors/python/3.8.9/Python-3.8.9.tar.xz, 然后将Python-3.8.9.tar.xz拷贝到服务器的~/.pyenv/cache/路径下, 如果.pyenv没有cache目录, 则先创建
然后执行命令pyenv install 3.8.9即可安装成功
pip安装第三方软件, 命令行中指定源
判断一个文件是二进制文件还是文本文件
def is_elffile(filename):
    try:
        FileStates = os.stat(filename)
        FileMode = FileStates[stat.ST_MODE]
        if not stat.S_ISREG(FileMode) or stat.S_ISLNK(FileMode):  # 如果文件既不是普通文件也不是链接文件
            return False
        with open(filename, 'rb') as f:
            header = (bytearray(f.read(4))[1:4]).decode(encoding="utf-8")
            if header in ["ELF"]:
                return True
    except UnicodeDecodeError as e:
        pass

    return False

def is_text(filename):
    s=open(filename).read(512)
    text_characters = "".join(map(chr, range(32, 127)) + list("\n\r\t\b"))
    _null_trans = string.maketrans("", "")
    if not s:
        # Empty files are considered text
        return True
    if "\0" in s:
        # Files with null bytes are likely binary
        return False
    # Get the non-text characters (maps a character to itself then
    # use the 'remove' option to get rid of the text characters.)
    t = s.translate(_null_trans, text_characters)
    # If more than 30% non-text characters, then
    # this is considered a binary file
    if float(len(t))/float(len(s)) > 0.30:
        return False

    return True
python 日志模块logging的简单实用
在主文件中配置日志
import logging

computername = os.getenv('COMPUTERNAME')
timestamp = datetime.datetime.today().strftime("%Y-%m-%d(%H)")

logging.basicConfig(
    filename = 'C:\\ATE\\{}\\FQC_{}.log'.format(computername, timestamp),
    level = logging.DEBUG,
    format = '%(asctime)s - %(filename)s:%(lineno)d - %(levelname)s - %(message)s',
)
然后在所有源文件中都可以直接实用, 包括主文件; 这样日志都记录到配置的日志文件中了
import logging
logging.info('test in {}'.format(__file__))
Python执行本地和远程命令实时输出
通过subprocess模块实现本地命令实时输出
from subprocess import Popen, PIPE, STDOUT

def run(command):
    process = Popen(command, stdout=PIPE, stderr=STDOUT, shell=True)
    while True:
        line = process.stdout.readline()
        if not line:
            break
        yield line

if __name__ == "__main__":
    for path in run('ping -n 5 10.68.184.21'):
        print path
通过paramiko模块实现远程命令实时输出
import paramiko

linseeCredentials = {
    'ip'       : '10.68.184.158',
    'user'     : 'tdlte-tester',
    'password' : 'ltetest'
}

class Connecter(object):

    def __init__(self, credentials):
        self.ssh = paramiko.SSHClient()
        self.ssh.set_missing_host_key_policy(paramiko.AutoAddPolicy())
        self.ssh.connect(credentials['ip'], username=credentials['user'], password=credentials['password'], timeout=3)
        self.sshTransport = self.ssh.get_transport()
        self.ftp = paramiko.SFTPClient.from_transport(self.sshTransport)
        self.session = self.sshTransport.open_channel("session")

    def exeCommand(self, command):
        self.session.get_pty() #这一行可以确保当前进程退出时, 远程命令可以被kill掉
        #有时候执行的远程命令如tail -f或者top之类时, 无法自动退出, 用这种方法比较好; 也可以配合self.session.settimeout(120)来使用.
        #参考链接:
        #http://stackoverflow.com/questions/7734679/paramiko-and-exec-command-killing-remote-process
        #http://stackoverflow.com/questions/7734679/paramiko-and-exec-command-killing-remote-process
        #http://stackoverflow.com/questions/2909481/paramiko-and-pseudo-tty-allocation
        self.session.exec_command(command)
        while self.session.active:
            if self.session.recv_ready():
                print self.session.recv(1024).strip()
            elif self.session.closed:
                return self.session.recv_exit_status()

    def closeConnect(self):
        if self.ssh: self.ssh.close()
        if self.ftp: self.ftp.close()
        if self.session: self.session.close()

if __name__ == '__main__':
    connecter = Connecter(linseeCredentials)
    connecter.exeCommand('ping 192.168.255.1 -c 10')
    connecter.closeConnect()
Python字符串顺序反转
>>> "6fe28c0ab6f1b372c1a6a246ae63f74f931e8365e15a089c68d6190000000000"[::-1]
'0000000000916d86c980a51e5638e139f47f36ea642a6a1c273b1f6ba0c82ef6'
python中条件表达式的四种实现方法
a, b, c = 1, 2, 3

1.常规
if a>b:
    c = a
else:
    c = b

# 2.表达式
c = a if a>b else b # 先执行中间的if,如果返回True,就是左边,False是右边。

# 3.二维列表
c = [b,a][a>b] #实际是[b,a][False],因为False被转换为0,所以是[1,2][0],也就是[1]
                      # False返回第一个,True 返回第一个。

# 4
c = (a>b and [a] or [b])[0]
# 这个比较好玩,False and [1] or [2],因为and的优先级高于or,先算and
# False和[1] and之后还是False,和[2]or之后却成了[2]
# True 和[1] and之后是[1],[1]和[2]or结果是[1]
# 也就是False和True在和别人做boolean运算的时候,根据and还是or,F和T在前在后有不一样的数据转换规则。
SSH实现交互命令
import re
import time
import socket
import paramiko

CREDENTIALS = {
    'ip'       : <ip>,
    'user'     : <username>,
    'password' : <passwd>,
    'port'     : <port>,
}


class SSHConnect():
    def __init__(self, credentials):
        self.ip = credentials['ip']
        self.username = credentials['user']
        self.passwd = credentials['password']
        self.port = credentials['port']
        self.__ssh = None
        self.__channel = None

        # 7-bit C1 ANSI sequences
        self.__ansi_escape = re.compile(r'''
                \x1B  # ESC
                (?:   # 7-bit C1 Fe (except CSI)
                [@-Z\\-_]
                |     # or [ for CSI, followed by a control sequence
                \[
                [0-?]*  # Parameter bytes
                [ -/]*  # Intermediate bytes
                [@-~]   # Final byte
            )
        ''', re.VERBOSE)

    def __del__(self):
        self.__close()

    def connect(self):
        self.__close()

        self.__ssh = paramiko.SSHClient()
        self.__ssh.set_missing_host_key_policy(paramiko.AutoAddPolicy())
        self.__ssh.connect(self.ip, username=self.username, password=self.passwd, port=self.port)

    def exec_command(self, cmd, end_str=('# ', '$ ', '? ', '% '), timeout=30):
        if not self.__channel:
            self.__channel = self.__ssh.invoke_shell(term='xterm', width=4096, height=48)
            time.sleep(0.020)
            self.__channel.recv(4096).decode()

        if cmd.endswith('\n'):
            self.__channel.send(cmd)
        else:
            self.__channel.send(cmd + '\n')

        result = self.__recv(self.__channel, end_str, timeout)
        print(result)
        begin_pos = result.find('\r\n')
        end_pos = result.rfind('\r\n')
        if begin_pos == end_pos:
            return ''
        return result[begin_pos + 2:end_pos]

    def __recv(self, channel, end_str, timeout):
        result = ''
        out_str = ''
        max_wait_time = timeout * 1000
        channel.settimeout(0.05)
        while max_wait_time > 0:
            try:
                out = channel.recv(1024 * 1024).decode()

                if not out or out == '':
                    continue
                out_str = out_str + out

                match, result = self.__match(out_str, end_str)
                if match is True:
                    return result.strip()
                else:
                    max_wait_time -= 50
            except socket.timeout:
                max_wait_time -= 50

        raise Exception('recv data timeout')

    def __match(self, out_str, end_str):
        result = self.__ansi_escape.sub('', out_str)

        for it in end_str:
            if result.endswith(it):
                return True, result
        return False, result

    def __close(self):
        if not self.__ssh:
            return
        self.__ssh.close()
        self.__ssh = None


if __name__ == '__main__':
    connecter = SSHConnect(CREDENTIALS)
    connecter.connect()
    connecter.exec_command('run-system-shell\n')
    connecter.exec_command('bash\n')
    connecter.exec_command('ls -al /sbin/phy\n')
Python 将自己实现的库打包成第三方库
单文件库打包
**只需要三个文件, 都放在同一目录下: **
__init__.py: 为空文件, 表示当前目录为一个包
sshlib.py: 为要打包的库
setup.py: 为打包工具
from setuptools import find_packages, setup

setup(
    name='sshlib',     # 包的名字
    version='1.0',     # 版本号
    description='custom ssh library, you can execute commands and transfer files through this library',   # 说明
    py_modules = ['sshlib'],   # 要打包的文件, 不需要后缀, 在Python中文件名就是模块名
    zip_safe=False,
    install_requires=[
        'paramiko',    # 依赖的库, 在安装的时候会自动安装
    ],
)
执行命令python setup.py build

执行完成后多了一个build目录
执行命令python setup.py sdist
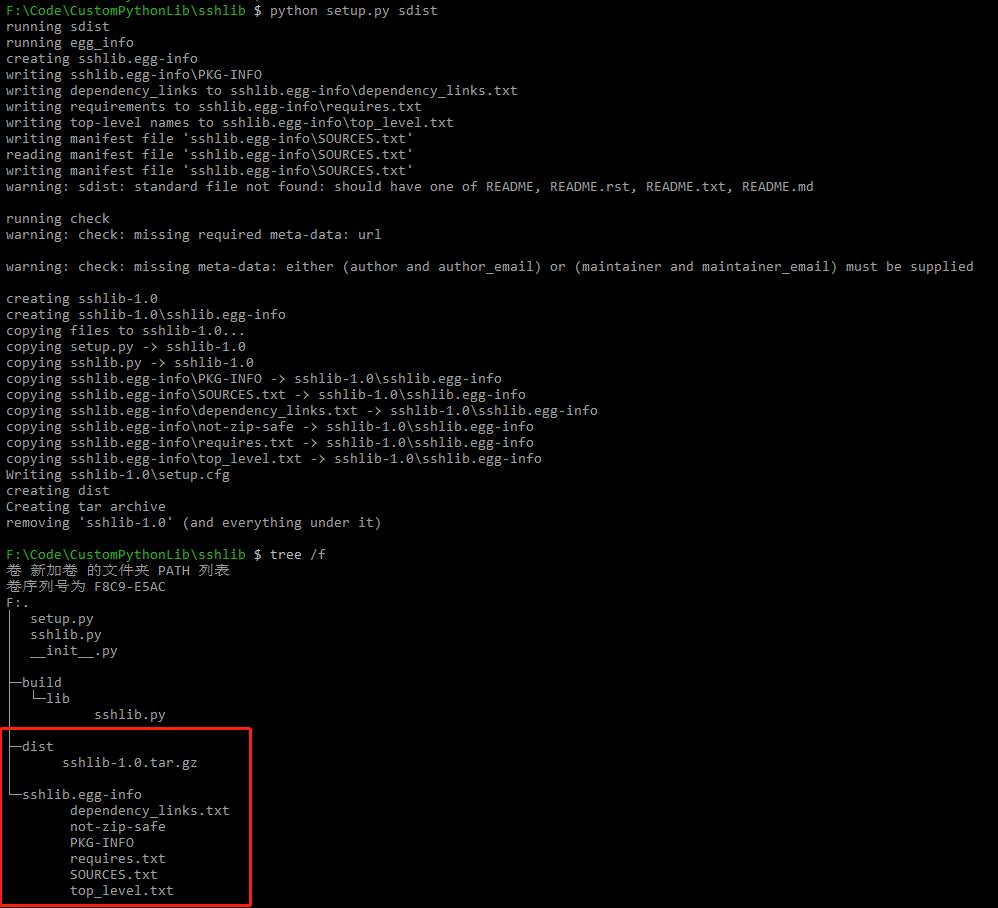
执行完成后多了dist目录, 里面的.tar.gz就是可以发布的包, 解压后执行python setup.py install就可以成功安装了, 也可以用pip uninstall sshlib来卸载
如果一个库下有多个模块需要打包:
首先要把需要打包的模块都放到一个目录下, 然后在目录同一级创建setup.py文件, 不去掉py_modules = [’sshlib’]参数, 增加packages=find_packages()这个选项即可, 其他操作不变
参考: https://www.cnblogs.com/mangM/p/11619247.html https://packaging.python.org/tutorials/packaging-projects/ https://setuptools.readthedocs.io/en/latest/userguide/index.html
通过Python第三方库uiautomator2来控制手机
安装:
- 在PC上安装adb工具, 下载地址http://adbdownload.com/, 下载后解压, 并将对应路径加到path环境变量中
- 使用pip install uiautomator2安装Python库
将手机设备地址加到C:\Users<username>.android\adb_usb.ini文件中, 如果没有adb_usb.ini文件则先创建, 设备地址获取方法:
- 在设备管理中找到对应的手机设备

- 在设备属性里查看设备的VID
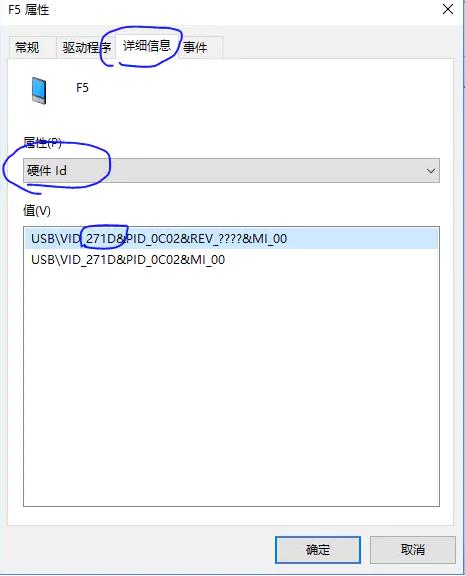
- 将0x271D加到adb_usb.ini文件中
打开手机USB调试, 连接手机, 用数据线连接手机
分别执行命令adb kill-server, adb start-server, adb devices就可以读取到手机的设备ID
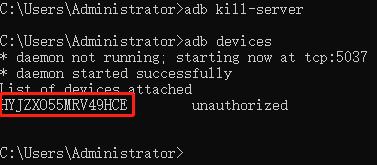
用Python的uiautomator2库连接手机
import uiautomator2
ue = uiautomator2.connect_usb('HYJZXO55MRV49HCE')
参考: https://blog.csdn.net/wangan_wangan/article/details/104215735 https://www.jianshu.com/p/e5ed2ddb3f27
使用paramiko库通过ssh发送Ctrl +C
- 发送chr(3)
SSH.send(chr(3))
- 直接关闭链接, 进程自然中断, 跟ctrol +c效果相同
说明: 一般按Ctrl+字母组合键时可以产生ASCII码为1-26的控制字符, 字母序号是几, ASCII码就是几, 这样Ctrl+C的ASCII码应为3
因此如果要发送Ctrl +E, 则发送char(5)
SSH.send(chr(5))
实例代码:
sshlib.py
import os
import re
import sys
import time
import socket
import paramiko


class sshlib():
    #初始化
    def __init__(self, host, user, password, sshport=22, debug=False, debugf=None):
        self.ssh = self.__connect(host, user, password, sshport)
        self.ssh_transport = self.ssh.get_transport()
        self.channel = None
        self.debug = debug
        self.debugf = debugf
        if self.debugf and os.path.exists(self.debugf):
            os.remove(self.debugf)

    def __connect(self, host, user, password, sshport):
        for try_times in range(30):
            try:
                ssh = paramiko.SSHClient()
                ssh.set_missing_host_key_policy(paramiko.AutoAddPolicy())
                ssh.connect(host, username=user, password=password, port=sshport)
                return ssh
            except Exception as ex:
                if try_times == 59:
                    raise
                time.sleep(2)
                print(str(ex))
                continue

    #执行命令和接收输出
    def exec_command(self, cmd, end_str=('# ', '$ ', '? ', '% ', ': ', ']'), match_str=None, timeout=20):
        # print(cmd)
        if not self.channel:
            self.channel = self.ssh.invoke_shell(term='xterm', width=4096, height=48)
            time.sleep(0.020)
            self.__recv(self.channel, end_str, match_str, timeout)

        if cmd == chr(int(3)):
            self.channel.send(cmd)   # 这里如果加了'\n'则执行失败
        elif cmd.endswith('\n'):
            self.channel.send(cmd)
        else:
            self.channel.send(cmd + '\n')

        try:
            output = self.__recv(self.channel, end_str, match_str, timeout)
            # if self.debugf:
                # with open(self.debugf, 'a', encoding='utf-8') as f:
                    # f.write(output)
        except Exception as ex:
            print('Execute command: {} failed'.format(cmd))
            raise

        return output

    def __recv(self, channel, end_str, match_str, timeout):
        max_wait_time = timeout * 1000
        channel.settimeout(0.05)

        out_str = []
        while max_wait_time > 0:
            try:
                out = channel.recv(1024 * 1024).decode('utf-8', 'ignore')
                if not out or out.strip() == '':
                    continue
                out = out.replace('\r', '')
                out_str.append(out)
                if self.debug:
                    print(out, end='')
                    sys.stdout.flush()
                if self.debugf:
                    with open(self.debugf, 'a', encoding='utf-8') as f:
                        f.write(out)

                if match_str:
                    if match_str in out:
                        return ''.join(out_str)
                else:
                    for it in end_str:
                        if out.endswith(it):
                            return ''.join(out_str)

                max_wait_time -= 50
            except socket.timeout:
                max_wait_time -= 50

        raise Exception('recv data timeout')
调用:
conn.exec_command(chr(3), timeout=20)
- 在robotframework中发送Ctrl +C
${crtl_c}   Evaluate    chr(int(3))
SSHLibrary.Write Bare   ${crtl_c}
参考: https://my.oschina.net/activehealth/blog/730146
multiprocessing.Process启动的进程, 在Linux下terminate失败
最近在做一个robotframework框架的时候, 用例已经执行完成了, 输出以下日志后一直卡主
17:05:03  Testcases                                                             | PASS |
17:05:03  18 tests, 18 passed, 0 failed
17:05:03  ==============================================================================
17:05:03  Output:  /home/jenkins/workspace/testradio_auto/reports/output.xml
17:05:03  Log:     /home/jenkins/workspace/testradio_auto/reports/log.html
17:05:03  Report:  /home/jenkins/workspace/testradio_auto/reports/report.html
反复确认后是robot命令还没有退出, 即卡在以下步骤
result = subprocess.call(robot_cmd, shell=True)
然后登陆到执行robotframework的环境上后发现, 还有Python进程, kill掉Python进程后, Job执行完成
并且该现象在Windows电脑上不存在, 在Linux电脑上必现
后来通过打印进程ID发现是一个multiprocessing.Process启动的进程没有终止, 导致主进程一直等待这个子进程; 但是我在主进程中调用了proc.terminate()方法
进一步查找, 发现terminate方法在Windows和Linux下的处理方式不同, 具体可以见terminate函数的Python官方文档
于是包装了一下terminate方法:
import os
import sys
import signal

def terminate_process(proc):
    if 'linux' in sys.platform:
        os.kill(proc.pid, signal.SIGKILL)
    else:
        proc.terminate()
然后通过terminate_process方法终止进程, 最终解决了上述问题
总结:
- 启动的子进程最好能保证正常退出, 避免调用terminate_process函数来强制终止
- 完善terminate_process函数, 以保证子进程正常退出失效后也能终止子进程
Python离线安装第三方库
公司内网某电脑不能上网, 需要安装Python环境, 这里我们将办公电脑上的所有第三方库移植到这个电脑上去
- 现在对应的Python版本, 拷贝到该电脑并安装完成
- 在能上外网的办公电脑上下载包:
- 制作requirements.txt: pip freeze > requirements.txt
- 下载单个离线包: pip download -d your_offline_packages <package_name>, your_offline_packages为当前目录下的一个文件夹名, 下载好的包会放到这个文件夹里, <package_name>为包名, 比如lxml, paramiko等
- 根据requirements.txt批量下载离线包: pip download -d your_offline_packages -r requirements.txt
- 然后将your_offline_packages文件夹和requirements.txt文件拷贝到目标电脑上
- 执行命令安装单个包: pip install –no-index –find-links=your_offline_packages package_name, your_offline_packages就是刚拷贝的目录, 也可以用绝对路径
- 执行命令根据requirements.txt安装所有包: pip install –no-index –find-links=your_offline_packages -r requirements.txt
Jupyter Notebook
Jupyter Notebook简介:
一个基于网页的用于交互计算的应用程序, 可被应用于全过程计算:开发、文档编写、运行代码和展示结果.
Jupyter Notebook是以网页的形式打开, 可以在网页页面中直接编写代码和运行代码, 代码的运行结果也会直接在代码块下显示. 如在编程过程中需要编写说明文档, 可在同一个页面中直接编写, 便于作及时的说明和解释
Jupyter Notebook的主要特点:
- 编程时具有语法高亮、缩进、tab补全的功能
- 可直接通过浏览器运行代码, 同时在代码块下方展示运行结果
- 对代码编写说明文档或语句时, 支持Markdown语法
安装:
pip install jupyter
- 运行Jupyter Notebook
查看帮助信息:
jupyter notebook --help
# 或
jupyter notebook -h
启动Jupyter Notebook:
在cmd进入到指定目录下运行以下命令, 执行命令后会启动一个web服务器, 用浏览器打开http://localhost:8888/网址即可
jupyter notebook
也可以用--port指定端口号, 然后在浏览器中用指定的端口http://localhost:9999/打开
jupyter notebook --port 9999
然后在浏览器中单击右侧的New -> Python即可