搭建ReadtheDocs托管笔记
Read the Docs是一个在线文档托管服务, 你可以从各种版本控制系统中导入文档, 如果你使用webhooks, 那么每次提交代码后可以自动构建并上传至readthedocs网站, 非常方便.
一般来讲, 这个非常适合写软件文档以及编写一些教程, 电子书之类. 对于一些一两篇文章就能写清楚的 可以记笔记或写博客, 但是如果要写成一个系列的, 不如写成一本书的形式, 更美观, 也更系统.
Sphinx + GitHub + ReadtheDocs 作为文档写作工具, 用 Sphinx 生成文档, GitHub 托管文档, 再导入 到 ReadtheDocs.
Sphinx
Sphinx是一个基于Python的文档生成项目, 最早只是用来生成 Python 官方文档, 随着工具的完善, 越来 越多的知名的项目也用他来生成文档, 甚至完全可以用他来写书采用了reStructuredText作为文档写作语 言, 不过也可以通过模块支持其他格式, 包括MarkDown格式.
- 安装Sphinx:
pip install sphinx sphinx-autobuild sphinx_rtd_theme
- 初始化:
# 创建文档根目录F:\cookbook, 并在命令行中进到该目录
cd /d F:\cookbook
# 然后执行以下命令初始化, 可以都选默认配置
sphinx-quickstart

#以下是执行结果
F:\cookbook>sphinx-quickstart
Welcome to the Sphinx 2.0.1 quickstart utility.

Please enter values for the following settings (just press Enter to
accept a default value, if one is given in brackets).

Selected root path: .

You have two options for placing the build directory for Sphinx output.
Either, you use a directory "_build" within the root path, or you separate
"source" and "build" directories within the root path.
> Separate source and build directories (y/n) [n]: y

The project name will occur in several places in the built documentation.
> Project name: CookBook
> Author name(s): GouJunping
> Project release []: 0.1

If the documents are to be written in a language other than English,
you can select a language here by its language code. Sphinx will then
translate text that it generates into that language.

For a list of supported codes, see
http://sphinx-doc.org/config.html#confval-language.
> Project language [en]: zh_CN

Creating file .\source\conf.py.
Creating file .\source\index.rst.
Creating file .\Makefile.
Creating file .\make.bat.

Finished: An initial directory structure has been created.

You should now populate your master file .\source\index.rst and create other documentation
source files. Use the Makefile to build the docs, like so:
   make builder
where "builder" is one of the supported builders, e.g. html, latex or linkcheck.
- 然后运行 tree -C . 查看生成的sphinx结构:
.
|-- Makefile
|-- build
|-- make.bat
`-- source
    |-- _static
    |-- _templates
    |-- conf.py
    `-- index.rst

4 directories, 4 files
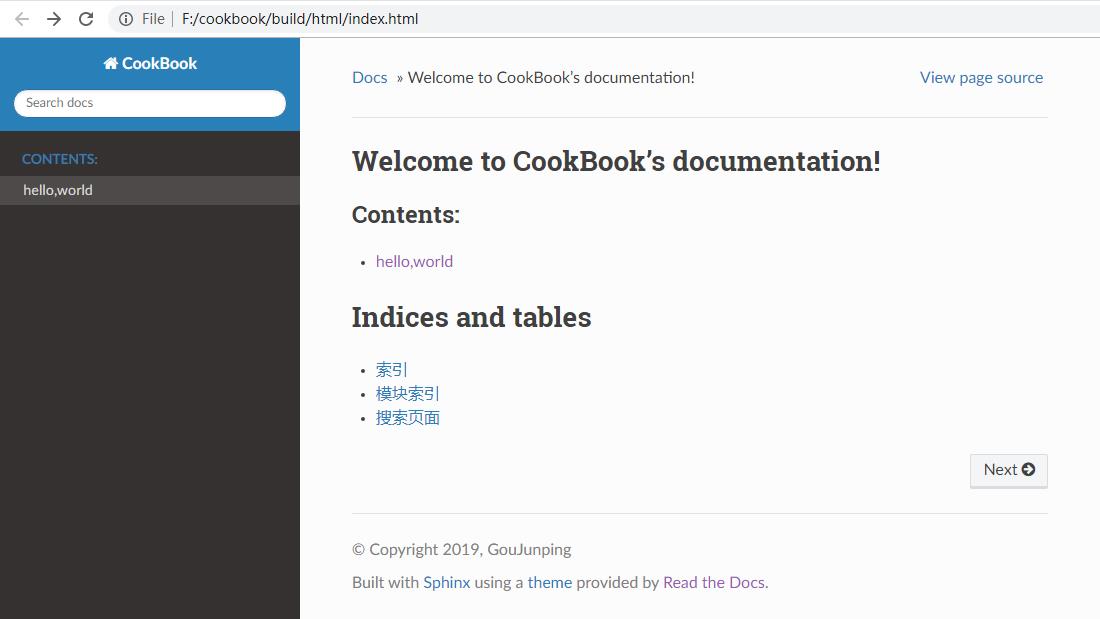
- 添加一篇文章, 在source目录下新建hello.rst, 内容如下:
hello,world
=============
- index.rst 修改如下:
.. toctree::
   :maxdepth: 2
   :caption: Contents:

   # 这里的hello是新增的,为hello.rst的文件名
   hello
- 更改主题 sphinx_rtd_theme:
更改source/conf.py:
# 用以下代码替换html_theme = 'alabaster'一行
import sphinx_rtd_theme
html_theme = "sphinx_rtd_theme"
html_theme_path = [sphinx_rtd_theme.get_html_theme_path()]
- 在根目录F:cookbook执行make html命令, 输出信息如下:
F:\cookbook>make html
Running Sphinx v2.0.1
loading translations [zh_CN]... done
making output directory... done
building [mo]: targets for 0 po files that are out of date
building [html]: targets for 2 source files that are out of date
updating environment: 2 added, 0 changed, 0 removed
reading sources... [100%] index
looking for now-outdated files... none found
pickling environment... done
checking consistency... done
preparing documents... done
writing output... [100%] index
generating indices... genindex
writing additional pages... searchc:\python36\lib\site-packages\sphinx_rtd_theme\search.html:20: RemovedInSphinx30Warnin
g: To modify script_files in the theme is deprecated. Please insert a <script> tag directly in your theme instead.
  {{ super() }}

copying static files... done
copying extra files... done
dumping search index in Chinese (code: zh) ... done
dumping object inventory... done
build succeeded.

The HTML pages are in build\html.
需要安装Python库
pip3 install -U Sphinx
pip3 install sphinx-autobuild
pip3 install sphinx_rtd_theme
pip3 install recommonmark
pip3 install sphinx_markdown_tables
- 进入build/html目录后用浏览器打开index.html
- toctree 支持多级目录,比如要想将python.rst,java.rst笔记在不同的目录,toctree这样设置:
Contents:

.. toctree::

   python/python
   swift/swift

# 也可以使用通配符*来匹配所有的.rst文件
Contents:

.. toctree::

   python/*
   swift/*
支持markdown编写
- 通过recommonmark 来支持markdown
pip install recommonmark
- 然后更改conf.py
from recommonmark.parser import CommonMarkParser
source_parsers = {
    '.md': CommonMarkParser,
}
source_suffix = ['.rst', '.md']
- 如果想使用高级功能,可以添加AutoStructify配置,在conf.py中添加
# At top on conf.py (with other import statements)
import recommonmark
from recommonmark.transform import AutoStructify

# At the bottom of conf.py
def setup(app):
    app.add_config_value('recommonmark_config', {
            'url_resolver': lambda url: github_doc_root + url,
            'auto_toc_tree_section': 'Contents',
            }, True)
    app.add_transform(AutoStructify)
网上有个详细配置: https://github.com/rtfd/recommonmark/blob/master/docs/conf.py
然后修改刚刚的hello.rst,改用熟悉的hello.md编写:
## hello world

### test markdown
再次运行make html后看效果,跟前面一样。
GitHub托管
一般的做法是将文档托管到版本控制系统比如github上面,push源码后自动构建发布到 readthedoc上面, 这样既有版本控制好处,又能自动发布到readthedoc,实在是太方便了。
先在GitHub创建一个仓库名字叫scrapy-cookbook, 然后在本地.gitignore文件中添加 build/目录,初始化git,commit后,添加远程仓库。
具体几个步骤非常简单,参考官方文档:https://github.com/rtfd/readthedocs.org:
- 在Read the Docs上面注册一个账号
- 登陆后点击”Import”.
- 给该文档项目填写一个名字比如 “scrapy-cookbook”, 并添加你在GitHub上面的工程HTTPS链接, 选择仓库类型为Git
- 其他项目根据自己的需要填写后点击 “Create”,创建完后会自动去激活Webhooks,不用再去GitHub设置
- 一切搞定,从此只要你往这个仓库push代码,readthedoc上面的文档就会自动更新.
注:在创建read the docs项目时候,语言选择”Simplified Chinese”
在构建过程中出现任何问题,都可以登录readthedoc找到项目中的”构建”页查看构建历史,点击任何一条查看详细日志:
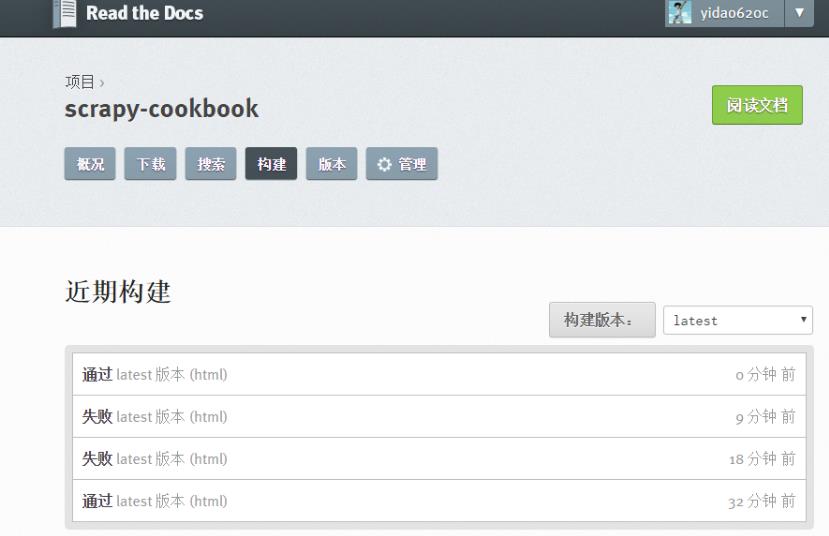
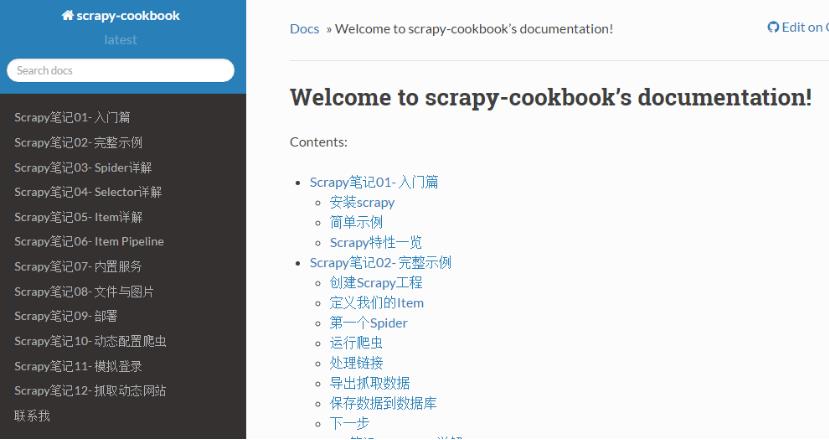
我将自己以前博客里面的关于scrapy的文章都迁移至readthedoc,现在看看效果:
生成PDF
首先要安装TeX Live,CentOS 7的yum库中的TeX Live版本比较老,所以直接安装官网上的版本。
在官网页面 下载安装包install-tl-unx.tar.gz
先安装依赖包:
yum install perl-Digest-MD5
然后解压缩安装:
tar zxf install-tl-unx.tar.gz
cd install-tl-*
./install-tl  # install-tl-windows on Windows
[... messages omitted ...]
Enter command: i
[... when done, see below for post-install ...]
安装时间会比较长,我这里安装大概要50分钟左右,请耐心等待…
安装完后配置PATH,在/etc/profile后面添加:
export PATH=/usr/local/texlive/2016/bin/x86_64-linux:$PATH
注意上面的路径改成你自己正确的路径,然后执行source /etc/profile即可
如果要生成中文PDF,还需要确认安装了东亚语言包和字体包
yum -y install fontconfig ttmkfdir
# /usr/share目录就可以看到fonts和fontconfig目录
# 首先在/usr/share/fonts目录下新建一个目录chinese:
cd /usr/share/fonts
mkdir chinese
# 紧接着需要修改chinese目录的权限:
chmod -R 755 /usr/share/fonts/chinese
# 从C:/Windows/Fonts目录复制你想要的字体到chinese文件夹
# msyh.ttf msyhbd.ttf simhei.ttf simsun.ttc wqy-microhei.ttc YaHeiConsolas.ttf
ttmkfdir -e /usr/share/X11/fonts/encodings/encodings.dir
vi /etc/fonts/fonts.conf
<!-- Font directory list -->
<dir>/usr/share/fonts</dir>
<dir>/usr/share/fonts/chinese</dir>

fc-cache
fc-list :zh
要用XeLaTeX 取代 pdflatex,我們需要修改conf.py:
# 注:在生成html的时候这句话要注释
latex_engine = 'xelatex'
然后执行
make clean
make latexpdf
完成之后在build/latex目录中即可找到生成的pdf文件了
1. ReadTheDocs可以自动生成中文PDF,但ReadTheDocs服务器里的TeXLive版本太老, 导致只能 使用pdflatex而不能使用xelatex编译,再加上服务器上中文字体的限制, 所以生成的PDF效果较 差,故不采用ReadTheDocs生成的PDF 2. 本地安装TeXLive 2016,用xelatex编译,可生成更好效果的PDF,目前的策略是在本地生成PDF
生成繁体PDF
先安装opencc
wget https://github.com/BYVoid/OpenCC/archive/master.zip
unzip master.zip
yum install -y cmake gcc gcc-c++ doxygen
cd OpenCC-master
make && make install
ln -s /usr/lib/libopencc.so.2 /usr/lib64/libopencc.so.2
写一个shell脚本来转换源码
#!/bin/bash
# 将某个文件夹所有文件简体转换成繁体字

curdir=`pwd`
file_dir=${curdir}/$1
for f in $(find $file_dir -type f); do
    #echo $f
    opencc -i "${f}" -o "${f}_"
    mv -f "${f}_" "${f}"
done
简体转繁体
./stot.sh scrapy-cookbook/source/
然后上面的生成PDF步骤不变。
FAQ
- build的时候出现错误:! Package inputenc Error: Unicode char 我 (U+6211)
解决办法,在conf.py中添加:
latex_elements={# The paper size ('letterpaper' or 'a4paper').
'papersize':'a4paper',# The font size ('10pt', '11pt' or '12pt').
'pointsize':'12pt','classoptions':',oneside','babel':'',#必須
'inputenc':'',#必須
'utf8extra':'',#必須
# Additional stuff for the LaTeX preamble.
'preamble': r"""
\usepackage{xeCJK}
\usepackage{indentfirst}
\setlength{\parindent}{2em}
\setCJKmainfont{WenQuanYi Micro Hei}
\setCJKmonofont[Scale=0.9]{WenQuanYi Micro Hei Mono}
\setCJKfamilyfont{song}{WenQuanYi Micro Hei}
\setCJKfamilyfont{sf}{WenQuanYi Micro Hei}
\XeTeXlinebreaklocale "zh"
\XeTeXlinebreakskip = 0pt plus 1pt
"""}
- WARNING: Pygments lexer name u’python run.py’ is not known
解决办法,写代码的时候别用’’’python run.py这样的格式,不支持
- WARNING: nonlocal image URI found
解决办法,更改conf.py
import sphinx.environment
from docutils.utils import get_source_line

def _warn_node(self, msg, node, **kwargs):
    if not msg.startswith('nonlocal image URI found:'):
        self._warnfunc(msg, '%s:%s' % get_source_line(node), **kwargs)

sphinx.environment.BuildEnvironment.warn_node = _warn_node
- 生成的PDF文件中图片不能显示的问题
解决办法,因为文章里面引用的是外部图片链接,导致不能显示图片, 将图片下载 到source/images目录,然后改链接为相对路径。
如要居中显示图片,使用
<center></center>
- 自动生成标题问题
修改conf.py将manual改成howto
latex_documents = [
    (master_doc, 'scrapy-cookbook.tex', u'scrapy-cookbook Documentation',
     u'Xiong Neng', 'howto'),
]
- 图片覆盖文字的问题
养成一个好习惯就是新增图片一定要空一行
one line

two line
- 生成的pdf文件中,每个章节都多了一层编号
我猜测这个问题的原因是sphinx将rst转为LaTex文件,再转为PDF的。sphinx生成的LaTex 文件中, 使用了Section标记段落,默认情况下Section是自动编号的章节,而Section*才是不带自动编号的。
为了解决这个问题,需要手工编辑sphinx生成的python3-cookbook.tex
cd build/latex/
vi scrapy-cookbook.tex
在setcounter{tocdepth}{2}下增加一行setcounter{secnumdepth}{-2}
这行代码关闭了章节编号的计数器,这样生成的PDF就是目录正确且章节不带自动编号。 请注意别乱动里面的 东西,删除一个空行也不行。
然后执行命令:
xelatex scrapy-cookbook.tex
这时候生成的pdf文件就是正常格式的了。如果一次执行不成功就再执行一次,很奇怪的事情。
具体原理解释参见http://liam0205.me/2015/04/10/how-to-list-unnumbered-section-in-the-table-of-contents/
优化PDF显示
这个参考 https://github.com/yidao620c/python3-cookbook/issues/108
编辑tex文件,在导言区的内容如下:
前面省略...
\title{《Python Cookbook》第三版}
\date{Dec 09, 2017}
\release{3.0.0}
\author{熊能}
\newcommand{\sphinxlogo}{\vbox{@@
\renewcommand{\releasename}{Release}
\makeindex

% 隐藏原目录名
\renewcommand{\contentsname}{}

% 在 section 前插入分页
\usepackage{titlesec}
\newcommand{\sectionbreak}{\clearpage}

% 章节编号只编号到 subsection
\newcommand\normalsecnumdepth{\setcounter{secnumdepth}{2@@

% 所有层次章节都不编号
\newcommand\specialsecnumdepth{\setcounter{secnumdepth}{-2@@

% toc 到 subsection
\newcommand\normaltocdepth{
    \setcounter{tocdepth}{2}
    \addtocontents{toc}{\setcounter{tocdepth}{2@@
}

% toc 到 section
\newcommand\specialtocdepth{
    \setcounter{tocdepth}{1}
    \addtocontents{toc}{\setcounter{tocdepth}{1@@
}

\begin{document}

\maketitle
\specialsecnumdepth
\specialtocdepth
\renewcommand{\contentsname}{}
\section{目录}
\vspace{-36pt}
\sphinxtableofcontents
\phantomsection\label{\detokenize{index::doc@@


\section{版权}
\label{\detokenize{copyright::doc@@\label{\detokenize{copyright:copyright@@\label{\detokenize{copyright:python-cookbook-3rd-edition-documentation@@
\begin{DUlineblock}{0em}
\item[] 书名:    《Python Cookbook》3rd Edition
\item[] 作者:     David Beazley, Brian K. Jones
...
在 section{第一章:数据结构和算法} 前插入 normaltocdepth
在 section{附录A} 前插入 specialtocdepth
另外执行下面命令,删除每个章节多余的Contents和下面的一行空格:
sed -i '/Contents:/,+1 d' python3-cookbook.tex
再次运行生成命令即可(最好执行2次):
xelatex python3-cookbook.tex
摘自: https://www.xncoding.com/2017/01/22/fullstack/readthedoc.html